Monday, March 19, 2012

Back to Belton -- For Some Culture and Maybe a Show

.
Back in September of 2010, I traveled down to a town called Belton South Carolina.  It is about twenty-five miles from home, with easy roads to get there.  They have a huge structure in town called the Belton Standpipe.  Actually, it is a water tower built in the early 20th century.  I wrote about it then. 

Last weekend, I met up with a new friend who rides a 1982 Honda CB450SC Nighthawk, and we rode down there again.  My friend was apologetic for the older machine he was riding, but it was more than up to our little jaunt today. 

The reason for our trip was not only to enjoy some of our unseasonably warm winter weather, but to view an art show.  Sounds very cultured, doesn't it? 

Well, this art show is at the Belton Center for the Arts, and until the end of March, displays only motorcycle-related artwork.   The show is called "Two Wheels, One Journey."  The famous local motorcycle photographer Patrick Welch has four of his photos on display amongst paintings, pastels, carvings, and other media.  Patrick had his photos printed on special paper, and they really stand out from typical prints.  

Here are thumbnails of Mr. Welch's work on display.  You can purchase exact prints of the photos on display from his website.


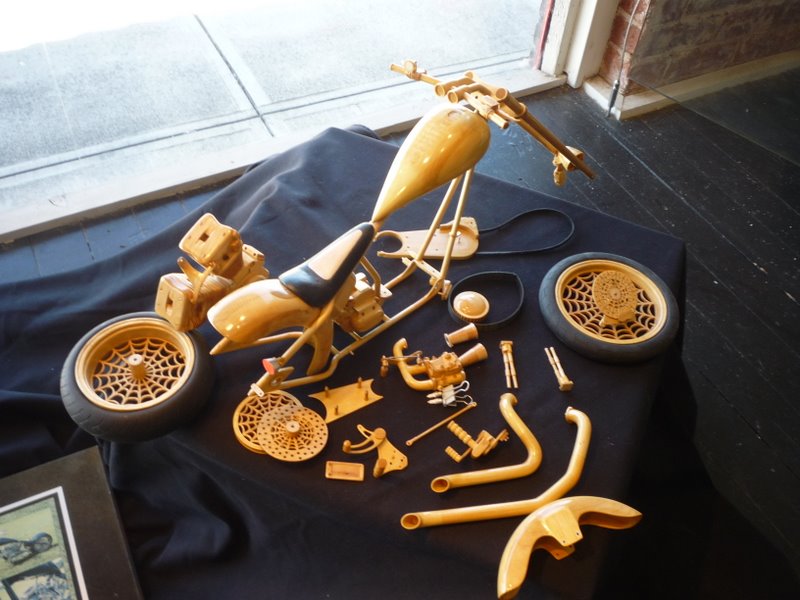
Some of the other artwork in the show includes these.


The carving on this one is very intricate, and the finish is impeccable. 


There will also be the The Ultimate Bike Show Rally on the Square in Belton on March 24th between 10:00 AM and 3:00 PM. You can enter as a participant or just go and drool. 

Across the street from the art gallery, is the old Southern/Blue Ridge Railroad Depot.  When built in 1910, it served 68 trains and trolleys, but by the 1960's, service to the station ceased.


It now houses a museum with mostly farming artifacts from the area right now.  For you John Deere fans, a 1943 model "LA", advertised to be the equivalent of three horses:
This one is equipped with attachments to furrow, plant, and fertilize in one pass.

The woman who greeted us in the museum, a retired school teacher, asked how we had found it.  We said we had come to view the artwork, which she proceeded to tell us was across the street in the art gallery.  She couldn't get over the fact that we had stumbled in to the museum instead.  She had us sign the guestbook, and she took our pictures, which I am sure will show up in the local newspaper.  Maybe they don't get many visitors.  Anyway, she provided some local interest that added to our visit. 

The South Carolina Tennis Hall of Fame is in the same building, but we were so eager to go get our culture for the day in the art gallery, that we forgot to go in. 

The standpipe is still there, by the way.  See:


The roads leading to and from Belton are well-paved, but rather uninteresting for the most part, good for cruising, I'd say.  There are not many places to pass slower traffic, either.  This is the route we took. 


View Larger Map


On the way back we passed through Anderson -- it was way too busy to enjoy the ride -- but enjoyed a stop at a little park just north of town on Lake Hartwell called Darwin Wright.  It offers swimming, a boat ramp, fishing, and picnicking. We just used the little rider's room, and chewed the fat for a few minutes. 

The day was only about 80 miles, but it was nice to get out on a warm winter day.
.

 .

Wednesday, February 29, 2012

Hey Guys, Y'all Watch This!

.
Now that I have your attention, I am not going to regale you with a tale of some daring -- but not well-thought-out -- act that resulted in disaster.  Nor, am I going to tell you that I have suddenly taken up stunt riding on my humble Ninja. 

No, instead, I am going to direct our attention to a Motorcycle Safety Foundation [MSF] webpage that gives all of us something to think about when looking through the face shields of our helmets.  Specifically, how we examine the world around us, searching for information on what is coming up, especially related to handling that next curve or potential hazard as we approach. 

Even though we are instructed to scan our full field of view when riding, there are times when we tend to stare at some point ahead. 

Click on the pattern below. 

You will see the rotating pattern on the MSF webpage.  There is a center green flashing dot and three yellow dots around the center one.

Now, stare at the center dot.

See the yellow dots winking out and back on occasionally?

That's in your head, not on the screen! 

Don't believe it? 

Look at the screen again, but this time make it a point to scan your eyes over the entire page, but still pay attention to the three surrounding yellow dots. 

Now they are visible all the time. Neat, huh? 


Try this, too: Blink more frequently than normal while looking at the page.

That keeps the yellow dots in view as well.  Neat, again. 

What is happening here?  It is similar to an effect called Troxler's fading, discovered in 1804 by Ignaz Paul Vital Troxler, and which is part of the general principle in sensory systems that an unvarying stimulus soon disappears from our awareness.  For example, if a small piece of paper is dropped on the inside of one's forearm, it is felt for a few seconds, then the sensation seems no longer to be present.  Same thing with vision. 

So, what does this have to do with motorcycle riding (and airplane piloting, and car driving, and a bunch of other things)?

This so called lack-of-motion-induced blindness can cause us to miss things that are in plain sight, such as potential hazards.  That car about to pull out in front of us, the deer waiting to leap across the road, a pothole or patch of gravel or ice, and so on and on. 

The following is paraphrased from various on-line sources: 

Pilots are taught to scan the horizon for a short distance, stop momentarily, and repeat the process.  This is the most effective technique to locate other aircraft.  It is emphasized to not fix one's gaze for more than a couple of seconds on any single object or position.

Keep your eyes moving and your head on a swivel. 

The most dangerous target is the one that has NO apparent motion. This is the one you will hit without evasive action. 


Well, that is pretty good advice, and surprising to most of us.

Next time you're out on your bike, remember old Mr. Troxler. 


Here are some other places to look for visual phenomenon: 

.

 .

Saturday, February 4, 2012

Valve Clearance Adjustment Tips

.
Well, as you know from an earlier post, I checked and adjusted the valve clearance on my Kawasaki Ninja 650R last month.  The procedure is well documented in the Ninja 650R service manual, but here are a few tips that made -- or would have made -- the job a bit easier and safer.

Before you start turning any wrenches, clean off the areas of the bike you are going to work on with an air hose and brushes.  This helps prevent dirt from falling into places it shouldn't be while you are removing bits and pieces. 

Next, realize that you might drop something during the procedure.  That may simply be a nuisance, but it can also be potentially serious if you drop something into the wrong spot inside the engine.  One of these spots is into the throttle bodies.  If you drop it there, there is a chance it will get into the valves and cause real trouble.  So stuff it... 
...with a couple of rags before proceeding.

After removing the seat and fuel tank, the airbox is removed from atop the engine.  Beneath it, the cover over the camshafts becomes visible.  There are several brackets and other items that must be removed to get the cam cover off. 

Even though the Ninja manual says to remove the throttle cables, I instead removed the right-hand radiator support screw to give sufficient clearance to remove and replace the cam cover from the top rather than out the right side.  The fit was tight, but possible.  Be careful not to damage the radiator fins with the corner of the cam cover.

If you wish to remove the cam cover the way the manual advises, out the right side, there is a bracket in the way.  The red one in the center of this photo. 
From a riderforum posting by MCRider. 

However, this bracket is not used on the Ninja, and you can bend it out of the way or remove it without harm.  

Another place where trouble could occur is if you drop something into the cam chain tunnel that runs down from the cam sprockets to the crankshaft.  This could require more extensive disassembly of the engine if you cannot retrieve a dropped item there.  So, stuff a rag into that space as well.

Keep a magnet nearby in case you drop something anywhere else.  The magnet comes in handy, too, to help extract the buckets from their guides.  If those terms sound cryptic, read on and learn. 

Measuring the current valve clearances is done according to the manual instructions, using feeler gages of various thicknesses between the cam and the valve lifter with the cams at the positions it describes.  The use of feeler gages takes some finesse, since you can fairly easily compress the valve springs trying to force a gage into a space that is smaller than the gage thickness.  You want the gage to just slip in with a light amount of friction.  That indicates that the gap is about the same as the gage thickness.  If the gage slips in easily, the gap is larger than the gage thickness.  This is one technique where it pays to have someone who is experienced show you the method so you can get the feel of it for yourself. 

If any of the clearances are not within the specifications, you must proceed with further disassembly. 

Since you have to remove the camshafts to adjust valve clearances on many motorcycle engines, one shortcut is to make sure the camshaft sprocket does not come out of time with the camshaft drive chain.  You have to loosen the camshaft chain by removing the chain tensioner to be able to move the camshafts aside one at a time, but you can prevent the chain from leaving its correct position on the camshaft sprockets by threading a wire tie through an opening in the cam drive sprockets and around the chain.  Like this:

That simple expedient helps save the time to reset the timing upon reassembly.  That is not to say that the timing shouldn't be checked once the cams are back in place.  If the cams are out of time, the engine will not operate and internal damage could result.

If you don't secure the cam chain like this, then do make certain that you loop something -- a shop towel will do -- under the cam chain and use the towel to drape the chain over the edge of the cylinder head to keep the chain from dropping down into the crankcase and to keep the chain engaged with that sprocket hidden way down there on the crankshaft. 

Another important part of making the clearance adjustment is keeping good notes.  Your feeler gage measurements must be recorded for each valve before you take anything apart.  For any valve whose clearance is outside the correct range, you must then determine what shim is currently installed between the valve lifter or follower (often referred to as a "bucket") and the valve stem for each valve.  That is why the camshafts have to come loose -- so you can get to the shims, which are beneath the cam followers on this engine.  The shims may be marked, but I had to measure each one of mine with a micrometer, again diligently recording their thicknesses.

I recorded the data on a chart, showing before and after clearance measurements and shim thicknesses:

Here are a couple of photos from the procedure written by Black Lab for his Suzuki V-Strom DL-650 on the Stormtroopers* forum.  This one shows a magnet being used to lift out the bucket from its guide. 

This photo shows the shim stuck to the inside of the bucket by the oil film between the two. 

It is a very good idea to take more photographs during disassembly than you think you need in case some don't turn out or don't show what you are puzzling over a few days later when you are trying to put things back together again.   My memory seems to be getting shorter and shorter these days, so the camera becomes importanter and importanter. 

A chart in the manual tells you what new shim thickness to put in place, based on the measured clearance and the thickness of the current shim.  You can also do a simple calculation to determine this, though it is easy to get your plusses and minuses mixed up, resulting in installing the wrong shim thickness. A simple spreadsheet can also help.  (See below.) 

Only after you have made the clearance and existing shim thickness measurements can you determine whether any of the shims can be moved to another valve to provide the correct clearance there, or whether new shims of other thicknesses are required.  I moved three to other valves, left one alone, and purchased four shims to get all mine within spec.  The shims cost about ten dollars each, postage included; the lowest price I could find.  Mine came from Ron Ayers. 

Remember that the valve clearance generally decreases with use, so thinner shims are usually required to bring the clearance into the specified range.  This seemed backward to me.  I thought valve train wear would have increased clearance.  Apparently it is not the usual case that the valve train wears.  Instead, the valves wear into their seats.  This decreases valve train clearance. (Some clearance is necessary to allow for expansion as the valves and valve gear get hot. If there is no clearance then there is a risk that valves will not seal properly, will not transfer combustion heat to the cylinder head as well as they should, and hot gas could blow by them, which could damage both the seats and the valves.)   

Since too little clearance in the valve train risks serious valve and head damage, it is a good policy to aim for the high end of the clearance tolerance when selecting new shims.  I found all four intake valves to be near the low end of, but within, the clearance tolerance, so I changed the shims there to introduce more clearance -- still within spec -- to avoid the possibility of their becoming too tight between now and the next check. 

Here is a good article* from the ALL THINGS MOTO forum that shows how to perform a valve adjustment on a Suzuki RMZ450 single cylinder motocross bike.  The procedure is quite similar for the Ninja, and other overhead cam engines that use shim/bucket valve gear.  There, you will also find the spreadsheet* that helps you select the correct new shim thickness in case you don't want to otherwise calculate it or don't have the service manual. 

Once the cams are back in place, the clearance is again checked to make certain you have not made a mistake.  After that, reassembling everything with new seals is all that is required before getting back on the road. 

I say "all that is required."  An understatement, for sure. 

A big difficulty for me was getting the cam cover gasket to stay in its groove in the cam cover while reinstalling the cover to the cylinder head.  A little old fashioned rubber cement in the groove saved the day. 

Also, reaching the various hoses that attach to the airbox was a challenge.  You need tiny hands and hemostats to put back some of them. 

While I had things apart, I also did some other maintenance:  
  • Replaced the spark plugs 
  • Cleaned the crankcase vent reed valves
  • Cleaned and re-oiled the air filter element 
  • Degreased all of the parts removed 
  • Re-cemented one heated grip
  • Checked the clutch free play
  • Did quite a bit of general cleaning (mostly leftovers from my occasional gravel road excursions)
I took my time on this work because I was unfamiliar with the procedure and with the engine.  I suppose I took around fifteen hours all together to do just the valve clearance work, including reading the manual, doing Internet research, ordering the parts, being very careful to document the order of things, keeping the fasteners with the parts they held, and double (sometimes triple) checking myself as I went along.  Next time will be faster.

The forum poster who calls himself Black Lab that I mentioned above has some additional good advice:
Pick a [time period] where you know that you will not have interruptions. Work at [a] pace that you are comfortable with. When you feel yourself tensing up, walk away from the project for a little bit, then return.
Now, the acid test: Will it start?

One push of the magic button provided the gratifying sound of a well-running engine.  I was careful not to rev the engine initially to make sure everything that had been disassembled was receiving oil. 

I couldn't resist taking a picture of my ride after the mechanical work was done but before the plastic was put back on.  She looks a bit menacing that way, in the half light of the evening. 

The next day, my first trip after the mechanicing, was an enjoyable 138 miles around the mountains north of home on some familiar rods and some less so. The engine seems a bit peppier with things adjusted, replaced, and cleaned. 

She should be good to go for around 26,000 more miles now.

See y'all out there riding! 


*  You may have to register to view the forum articles, but that registration is free.
.
 .

Friday, January 27, 2012

Cold!, Dressed up Rhinos, Somebody's Been Practicin', and Pretty Clouds

.
While you are waiting for me to get the bike put back together, here is a little writeup of a couple of other trips taken recently.

As you know, I usually go out riding on Saturdays, and lately I have endured/enjoyed some pretty cold temperatures.  A Saturday almost two weeks ago is a good example.  The temperature in the morning was only 25F, but there had not been rain for a couple of days, so ice wasn't likely on the roads.


As an aside, amazingly, the day before New Years was up into the mid-sixties.  Remember these guys?

Here is a better view.

They were all dressed up for Christmas.  I visited them on that warm day. 


Back to the cold.  I bundled up as I usually do, stoked up the heated grips within the bar muffs, and headed out.  A little cold air found its way to the back of my neck, but other than that, I was quite comfortable, despite the calculated wind chill at 40 miles per hour -- about six degrees F.  I headed to the south in an attempt to find some interesting scenery or roads.

I didn't see any other bikers on the road -- not tough enough, they, I smugly concluded.  (Another motorcycle blogger, an iron-willed rider, has apparently had the same kind of self-satisfied thoughts.)  

Well, I really didn't see any other bikers out and about until much later in the day, when it had warmed up a lot -- to about fifty.  Anyway, I wasn't cold and enjoyed the ride.  In fact, it is an interesting phenomenon knowing that it is cold and windy, but feeling only the effects of the wind, not of the cold.  Superheroes must feel like that, I suppose.
Superhero? -- NOT!


I didn't find much in the way of exciting roads that day, but I happened across a place where someone had been practicing.  In the boat launch parking lot on Lake Secession, I spotted paint markings on the pavement that looked familiar.  A little like this:

I wrote about that last July. 

Someone had been practicing his cone weaves apparently, judging from the pattern.


That last cone, shown below, is perilously close to a curb, so I don't know whether the guy practicing was especially good, and able to miss the curb on his last left hander, or whether he simply omitted swinging around the last one to avoid that potentially cruel boundary.

Maybe he just isn't a very good planner.


By the way, Lake Secession was named because South Carolina was the first state to secede from the union in the Civil War.  The lake was originally privately owned: One J. Roy Pennell exercised his resourcefulness during the Depression era when he decided to build a dam and sell electric power to the city of Abbeville. With men and equipment standing idle due to the economic conditions, Pennell purchased land at his own expense and built a dam about fifteen miles northwest of the city, thus creating Lake Secession. The project was nearly ready to begin producing electricity when the federal government intervened, declaring that private individuals could not sell power to municipalities. In time, Pennell sold the lake and dam to the city of Abbeville, which uses it now to generate electricity.  Note the government takeover of a private venture.  Sounds familiar, doesn't it?  Bureaucrats think they can manage better than free enterprise.  They never can, though. 

Here s a view of the lake from the boat launch lot.  

Kind of a pretty place.  I wonder whether the practicing biker improved his technique.


On another, warmer, Saturday, this time about three weeks ago, I went out and rode to Devil's Fork State Park, Oconee Station, Tamassee, and a few other familiar places.  Devil's Fork lies on Lake Jocassee, and though I didn't take many other pictures that day, the clouds struck me as beautiful.  So, here are a couple of shots of them, against the mountains of the Blue Ridge Escarpment.


We are certainly blessed to live in this beautiful country of ours, cold or warm. 
.

 .

Thursday, January 19, 2012

No Riding This Week

.
I'm not going to ride my Ninja this week.

No, I didn't take a tumble, and it's not the weather.  [Edit 1/23/2012: Well, actually, the weather has been rainy almost since I turned the first wrench on this task.]

Instead, I have work to do.  See what it is? 

Yep.  Time for a valve clearance check.  

What a pain!  You have to remove the seat, tank, air intake box, cylinder head cover, and a host of related brackets and shields.  Only then can you see the cams and valve lifters to check their clearances using a feeler gage set.  

Naturally, some adjustments are needed, so off come the cams and the bucket lifters, and the shims.  Then the micrometer comes out to determine the existing shim thicknesses.  

Then to the service manual table to determine what the new shim thickness should be for the eight valves. 

Next, to the Ron Ayers website to order the shims.  Last time I ordered something from them the service was quick, the phone man was helpful and courteous, and the shipping time was short, even for items not in their stock. 

I'll be cleaning things in the meantime, readying the parts for reassembly.  

Although I have been a grease monkey for most of my life, this is my first time into an engine that uses shims for valve adjustment.  Lots of work to change out some itty bitty parts.  

Oh well.  It is one of the pleasures of owning a motorcycle: Fixing it yourself.  

See you on the road in a few days!  


See also: Valve Clearance Adjustment Tips I learned while doing this work.  
.

 .

Tuesday, January 10, 2012

Zipper Fix

.
A short while back, I wrote about a rather serious situation where I became trapped under trying circumstances.  I told you, kind reader, about a temporary fix for the fix I was in. 

I have since discovered a better looking, more permanent solution.  It is called Zipper Mend, and is available direct, and from Amazon.  It costs about $3.99 for one, but it is still much less expensive than replacing the zipper entirely. 

The replacement zipper pull is made of two zinc die castings that are hinged together.
You squeeze the two parts together, which causes the claws to close through the zipper slide.  A detent locks the two castings together so they don't reopen.  You can Super Glue the two together, but don't drip any on the zipper teeth or you really will be stuck!

The claw part is a little thick, causing the dog in the zipper that prevents it from slipping down from engaging fully.  The zipper sometimes slides down as a result.  Not a huge problem, though.  

Neat.
.

 .

Saturday, December 31, 2011

Sweepers Galore

.
Sweepers are today's topic.  No, not this kind of sweeper:

This kind:
(I'll tell you where this sweeper is later.)
In particular, this is an account of a day of riding an abundance of sweeping curved roads not too far from home.

About two weeks ago, on December 17, the weather was beautiful for a near-winter day in the upstate of South Carolina.  It was about 43 degrees in the early morning, and rose to around 68 in the mid afternoon.

Almost balmy, I'd say! 

I couldn't waste this opportunity to get out on the bike, since I hadn't been for a couple of weeks: Working man, here, you know.  I selected a place that had just appeared on the ADVRider Upstate South Carolina tag game forum thread, near the Georgia state line, at the southern trailhead for the twenty-five mile long Chattooga River Trail.

Another rider had grabbed that tag the day before, but I had not recently ridden over that way, so I went there just for the fun of it.

I started out from home on SC-93, then took the four-lane US-123 all the way to Westminster, SC.  The latter is a mostly featureless road, good for getting somewhere else.  I then branched off to the northwest on US-76.


Part way along 76 is where the sweepers begin.  There are quite a few, nicely spaced, here. The pavement is also very good on this road, and the traffic is not usually heavy. 

I am confused, however, by the curve advisory signs.  Many of them advise 25 miles an hour.  After a few of these taken at 40, I begin to make that my advisory speed instead.  Some of you probably could take them at much higher speed, but I am not very familiar with the road, and don't want a surprise.  There are also a couple of places marked with a reverse turn sign like this.
That implies two tight turns in a row...but there is nary a tight reverse turn to be found.  Odd.  This could make people disregard the advisory signs all together! 

I enjoy the ride with the easy turns all the way to the border with Georgia.  There, on the right side, is the parking area for the trailhead, my destination where the tag was.  There, also, is a place to put in to the Chattooga River for paddlers.

It happens that there is a group of four who are getting ready to go onto the river when I arrive.  They say that they are going to put in above Bull Sluice, and paddle the four miles or so to Lake Tugaloo, referred to as Section IV.  I naively ask if this is rough water.  One guy looks me in the eye, pausing as he is filling in the boater registration form (which is what they use to determine how many didn't come back alive), and flatly states that there are more deaths in this section of the river than anywhere else.

 
Oh.

A few minutes later, I strike up a conversation with another one of the group who had put in at the beach near the US-76 bridge instead of further upstream above Bull Sluice.  Seeing my biker suit, he tells me that he used to ride a motorcycle, but these days he only does things that are safe -- like kayaking in class IV rapids.

Oh, again.  Am I missing something here? 

This is a picture of the prudent one, playing in the light rapids, waiting for the others in his group to come down the river from Bull Sluice.
I watch for a few minutes, but when they don't arrive, I head back up to the parking lot.  The climb is steep and I am laboring to get there.

I don my helmet and gloves again, then turn back in the direction I came.  I go to Academy Road and turn left.  Historic Long Creek Academy is a little way down this road.  This was a Christian school established in 1914 under the Beaverdam Baptist Association and the Home Mission Board of the Southern Baptist Convention.  It was one of six "mountain mission schools" in the South including four others in South Carolina.  The Academy once owned fifty-five acres.  The stately Sullivan Building (pictured below) was completed in 1917. 

The Academy closed in 1956, and the buildings are now considered historic sites and currently house the Chattooga Ridge Adventure Center, a whitewater rafting company. 

I wind my way back to route 67, then take Chattooga Ridge Road toward the northeast.  This road, too, has some nice sweepers, and is in good condition.  I turn onto Verner Mill Road to cut off a corner and get to the intersection of SC-28 and SC-107.

Well, here.  It is easier to show you the map of my entire ride:

View Larger Map

To orient you, we are at the intersection south of Pushpin "D."  There, I turn north on 107.  More sweepers and few tighter bends here.

I think this is getting to be a trend. 

On the right, Oconee State Park provides a place to rest for a few minutes, and is a great place to go for picnics, hiking, swimming, fishing, cabins, and camping. 

I turn north again on 107.  This road is a rather steady uphill with more nice turns.  (This is a trend.)  Uphill turns are easier for most motorcycle riders than downhill turns, and I am enjoying this smooth road, too. 

I pass Cheohee Road, also known as Winding Stair Road, a twisty gravel road I took a few weeks ago, then reach the Wigington Byway cut through.  There, I turn right.  I have written before about this very short road with a nice surprise part way along it. 

Today, as the surprise comes into view, my breath is taken away by the vista of Lake Jocassee in the distance. The light is particularly good today, but my photographs don't do it justice by any means.  I walk up the road a bit to get as close to the point of my first glimpse of the lake today as possible. 
 

A little closer:

Closer still:


After a stop at this fine overlook, I continue on to SC-130 and head a little ways north to Whitewater Falls.  I just stop here to rest a little, then head back south on 130.  This road has some very long sweepers, and the surface is mostly very good.  A bit of extra caution is required at the intersection of Wigington Byway and at one other intersection, also on a curve, further south, since there is not much sight distance at either one. 

By the way, as long as we're talking about sweepers, SC-107 continues north to Cashiers North Carolina and beyond with varying degrees of turns, as does SC-130, which turns into NC-281. 

Alas, when I reach SC-11, I must travel on this almost-straight road for about fifteen miles, to the Holly Springs Country Store at US-178.  There, I get a chance to make a few more turns before reaching home.  I turn in a generally southerly direction on 178, and run the sixteen miles or so back to Easley.   The section between the Holly Springs Store and Pickens South Carolina being the best.

(Remember that the section of 178 north of the store is very much twistier, and much loved by bikers here and abouts.  I don't go that way today because there may be wet leaves and sand in the shadows, and I don't have any more time to be away.) 


I have gone about 156 miles today on a range of roads from straight to mostly sweeping curves, with a few tighter places thrown in.

This would be a good route for the winter to keep away from the more difficult tight twisties. 

Try it some time. 
.


.